samsung
C:\Program Files (x86)\Samsung\Samsung SCX-4300 Series\Install\PRINTER\SPL\WINXP_VISTA_64\sse1m.inf
HP
C:\Program Files\HP\HP LaserJet M1210 MFP Series\HPM1210.INF
วันจันทร์ที่ 22 ธันวาคม พ.ศ. 2557
วันศุกร์ที่ 19 ธันวาคม พ.ศ. 2557
ตัวที่ถูก
แก้ไข gis4jhcis
ไฟล์ \gis4jhcis\includes\config.inc.php
บรรทัดที่ 70
จาก echo "\t<option value=\"$a\">$ThaiMonth[$i]</option>\n";
เป็น echo "<option value='" . $a . "'>". $ThaiMonth['$i']."</option>";
ไฟล์ \gis4jhcis\includes\config.inc.php
บรรทัดที่ 70
จาก echo "\t<option value=\"$a\">$ThaiMonth[$i]</option>\n";
เป็น echo "<option value='" . $a . "'>". $ThaiMonth['$i']."</option>";
วันพฤหัสบดีที่ 18 ธันวาคม พ.ศ. 2557
key serial rar password pass
Boilsoft Video Converter 3.02.8
Name: Derrick Roberts
Activation key: 46DC7F41-0233275F-84B73071-544F974F-4B39F43A-697DB4F7-7300
Boilsoft Video Cutter v1.21.111
Name: Dan Nguyen
Activation key: A78A43E0-A9D253B3-8AF812D8-9B58FF1A-959DC347-E2EEA3ED-E54A
iResizer 3
HQHK-AAOX-AAIB-ANNX-APAX-AAAA-AAAB-BBBB
Long Path Tool 4.8.3
3969571672256892600
HDD Low Level Format Tool 4.40
COMMERCIAL
U5DR-EHQL-AJS9-2CYP
B2CY-QQNV-ZZXN-NADH
T8HH-3BLC-R4WL-PJUY
FHFM-LMYT-ENWQ-4F5Q
ZKJ8-T5Y3-8S9B-HQWL
HOME
C2B3-3DT3-P9ZZ-55XC
JJZE-TNRN-KM3K-Y5WK
JJZE-TNRN-KM3K-Y5WK
WVEY-VX66-25T9-L3HY
PDR6.6
Personal License
M5WU8MSFXU3K5FMKPPX8SSC3SA4XXWPC
45PUKFW38X4CAS3KFKPWCSPSWMKXCFPW
A5PXAMWVXWYPACYVC8V5X83SAA8VAXPW
55UAYKSPMWAUA3AKVCFKWK4KPAM34PP3
Technician License
VSPUYPKPAVMX4CKAA4VW4S8WF4CA55P4
YS3XSPMYWAPFW5FFUWWKV5PPSCVUY5PU
ASP43UMU4AY5XK54PACPSYYFV4CFPFPU
SSFM45KCSMCMKXP8U883V8Y55CKMK5P5
Commercial License
FUMCUMSC4AKWMW4YCVS4AMCF3M3CY558
WUMWPWWYXAKY3AX85VV3X434FAKXU45Y
WUMWPWWYXAKY3AX85VV3X434FAKXU45Y
WUXWSPSSMACYYXFUWXKW4WAWFAYUMK55
Enterprise License
F3WXMS4FYMSUVA3YYYAK5A4KUC3U3MUC
P34PMSP4XVCXMM3AU8UF5M53M4C8KMUF
X3P8X34VX5PPKX5WMCPM85X4S4YKS3UX
U35KUY435A5CCA5KXKUFUMUYF4CV3CUX
Windows Xp Original Sp3 Sata
KEY MR49R-DRJXX-M6PX2-V96BF-8CKBJ
วันอังคารที่ 16 ธันวาคม พ.ศ. 2557
This will execute $cmd in the background (no cmd window) without PHP waiting for it to finish, on both Windows and Unix.
function execInBackground($cmd) {
if (substr(php_uname(), 0, 7) == "Windows"){
pclose(popen("start /B ". `$cmd`, "r"));
}
else {
exec(`$cmd` . " > /dev/null &");
}
} ?>
http://php.net/manual/en/function.exec.php
if (substr(php_uname(), 0, 7) == "Windows"){
pclose(popen("start /B ". `$cmd`, "r"));
}
else {
exec(`$cmd` . " > /dev/null &");
}
} ?>
http://php.net/manual/en/function.exec.php
The correct ways to access form elements
http://www.coderanch.com/t/477642/HTML-CSS-JavaScript/Read-text-values-javascript
document.formName.elementName.value
document.forms["formName"].elementName.value
document.forms["formName"].elements["elementName"].value
document.forms[index].elements["elementName"].value
document.forms[index].elements[index].value
document.getElementById("elementId").value
document.formName.elementName.value
document.forms["formName"].elementName.value
document.forms["formName"].elements["elementName"].value
document.forms[index].elements["elementName"].value
document.forms[index].elements[index].value
document.getElementById("elementId").value
วันจันทร์ที่ 24 พฤศจิกายน พ.ศ. 2557
How to Mount Your Box.com Storage in Ubuntu Desktop
from http://ubuntuhandbook.org/index.php/2014/08/map-box-com-storage-ubuntu-desktop/


NOTE that normal user only have read permission to the mounted storage, you need to open Nautilus with root for full access (drop and drop to upload, delete, etc…). To do so, run

This quick tutorial shows you how to mount and map your Box.com storage in Ubuntu desktop so that you can access your cloud storage within Nautilus file browser.
There are many cloud storage services available for Ubuntu Linux. Box.com is one of them that provides 10 GB free web space with 250 MB file upload size. It allows to access directly through WebDav protocol.
There is an open source project Box2Tux, it makes the configuration of WebDav protocol easy. All you need to do is insert your Box account name and password, then it allows you to access the cloud storage directly in Nautilus file browser by mounting it automatically at start up.

gksudo nautilus in terminal or in Alt+F2 ‘Run a command’ dash.
Mount Box.com Storage in Ubuntu:
1. First of first, install davfs2 (WebDav) from Ubuntu Software Center.
You can click the link below to bring up Softare Center and click the install button.
2. Press Ctrl+Alt+T on keyboard to open the terminal. When it opens, paste the commands below and run one by one:
Reconfigure davfs2 and select Yes to allow non-root user to mount the WebDav resource:
sudo dpkg-reconfigure davfs2
Download Box2Tux:
wget https://github.com/alfredobonino/Box2Tux/archive/master.zip
Extract the downloaded package:
unzip master.zip
Navigate to the result folder:
cd Box2Tux-master/
Give permission and run the box2tux:
chmod +x box2tux && ./box2tux
Input your box.com account and password when prompt:
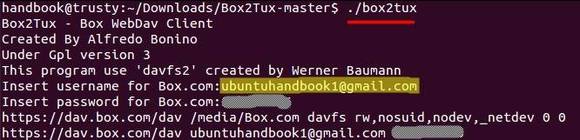
Once done, you should get box.com mounted just as a network drive on Unity Launcher. Enjoy!
วันอาทิตย์ที่ 23 พฤศจิกายน พ.ศ. 2557
บันทึกจาก noip
New configuration file '/tmp/no-ip2.conf' created.
mv /tmp/no-ip2.conf /usr/local/etc/no-ip2.conf
mv /tmp/no-ip2.conf /usr/local/etc/no-ip2.conf
วันพุธที่ 19 พฤศจิกายน พ.ศ. 2557
วันอังคารที่ 18 พฤศจิกายน พ.ศ. 2557
http://kodi.wiki/view/Samba
Samba
Samba the Linux and Unix implementation SMB/CIFS (aka, Windows File Sharing). If it is not included in a given OS distro, it can be installed easily to share files to XBMC (among other uses). Samba/SMB is often a good choice due to it being highly compatible with other computers, regardless of the OS.
Contents[hide] |
1 Installing
- Gentoo
emerge samba
- Debian/Ubuntu
sudo apt-get install samba
1.1 Compile from source
Installing Samba regardless of distro
wget http://us4.samba.org/samba/ftp/samba-latest.tar.gz
tar -xvf samba-latest.tar.gz
cd samba-{version}
./configure
make install
tar -xvf samba-latest.tar.gz
cd samba-{version}
./configure
make install
2 Configuring
Note: The example below is for a public share.
Samba's configuration is stored
/etc/samba/smb.conf. All the following items should be placed in that file.2.1 Global configuration
[global]
workgroup =>
workgroup =
netbios name =
server string =
http://verahill.blogspot.com/2012/03/building-and-installing-samba-from.html
93. Building and installing samba from source
Here's how to compile and get started with SAMBA, which may come in handy if you need to set up a mixed environment.
Compiling
sudo apt-get install build-essential
tar -xvf samba-3.6.3.tar.gz
cd samba-3.6.3/
cd source3
./configure
make
sudo checkinstall
You may want to look through the checkinstall settings:
*****************************************
**** Debian package creation selected ***
*****************************************
This package will be built according to these values:
0 - Maintainer: [ root@barebone ]
1 - Summary: [ samba 3.6.3 ]
2 - Name: [ samba ]
3 - Version: [ 3.6.3 ]
4 - Release: [ 1 ]
5 - License: [ GPL ]
6 - Group: [ checkinstall ]
7 - Architecture: [ amd64 ]
8 - Source location: [ source3 ]
9 - Alternate source location: [ ]
10 - Requires: [ ]
11 - Provides: [ source3 ]
12 - Conflicts: [ ]
13 - Replaces: [ ]
Enter a number to change any of them or press ENTER to continue:
Once the package is installed you need to put symlinks in your /usr/lib to the installed samba libs:
sudo ln -s /usr/local/samba/lib/libtalloc.so.2 /usr/lib/libtalloc.so.2
sudo ln -s /usr/local/samba/lib/libtdb.so.1 /usr/lib/libtdb.so.1
Finally, create smb.conf in /etc/samba/ and make samba find it using a symlink
sudo mkdir /etc/samba
sudo touch /etc/samba/smb.conf
sudo ln -s /etc/samba/smb.conf /usr/local/samba/lib/smb.conf
Done. Sort of. You need to configure samba using smb.conf...a minimal configuration file can be found at the end of the post.
Errors:
checking for gcc... no
checking for cc... no
checking for cl.exe... no
configure: error: in `/home/verahill/tmp/samba-3.6.3/source3':
configure: error: no acceptable C compiler found in $PATH
See `config.log' for more details.
Solution:
sudo apt-get install build-essential
error:
-bash: smbclient: command not found
solution:
put /usr/local/samba/bin in PATH
export $PATH=PATH:/usr/local/samba/bin
error:
/usr/local/samba/bin/smbclient: error while loading shared libraries: libtalloc.so.2: cannot open shared object file: No such file or directory
solution:
sudo ln -s /usr/local/samba/lib/libtalloc.so.2 /usr/lib/libtalloc.so.2
error:
/usr/local/samba/bin/smbclient: error while loading shared libraries: libtdb.so.1: cannot open shared object file: No such file or directory
solution:
sudo ln -s /usr/local/samba/lib/libtdb.so.1 /usr/lib/libtdb.so.1
Error:
/usr/local/samba/bin/smbclient: error while loading shared libraries: libwbclient.so.0: cannot open shared object file: No such file or directory
Solution:
sudo ln -s /usr/local/samba/lib/libwbclient.so.0 /usr/lib/libwbclient.so.0
error:
/usr/local/samba/bin/smbclient: Can't load /usr/local/samba/lib/smb.conf - run testparm to debug it
solution:
because I know where debian normally puts the smb.conf --
sudo mkdir /etc/samba
sudo touch /etc/samba/smb.conf
sudo ln -s /etc/samba/smb.conf /usr/local/samba/lib/smb.conf
Configuration:
Following https://www.samba.org/samba/docs/man/Samba-HOWTO-Collection/install.html#id2551954
Minimal /etc/samba/smb.conf:
[global]
workgroup = WKG
netbios name = MYNAME
[share1]
path = /tmp
Also, open up the relevant ports in your firewall:
Iptables
sudo iptables -A INPUT -p udp -m udp --dport 137 -j ACCEPT
sudo iptables -A INPUT -p udp -m udp --dport 138 -j ACCEPT
sudo iptables -A INPUT -p tcp --dport 139 -j ACCEPT
sudo iptables -A INPUT -p tcp --dport 445 -j ACCEPT

แก้ permission ในกรณีย์ jautoup แก้ไม่สำเร็จ
sudo chmod 777 -fR /home/pcu03314/\JHCIS_export21
sudo chmod 777 -fR /home/pcu03314/\JHCIS_export43
sudo chmod 777 -fR /home/pcu03314/\JHCIS_export43
วันพฤหัสบดีที่ 30 ตุลาคม พ.ศ. 2557
crontab ของ ผักแพว
#20130816
SHELL=/bin/sh
PATH=/usr/local/sbin:/usr/local/bin:/sbin:/bin:/usr/sbin:/usr/bin
# m h dom mon dow user command
0 16 * * 0-6 root /var/jhcis/mysql-backup-jhcisdb.sh >/dev/null 2>&1
0 0-23 * * 0-6 root /var/jepidem/runjepidem.sh >/dev/null 2>&1
0 0-23 * * 0-6 root /var/jxp18/runjxp18.sh >/dev/null 2>&1
0 13,16,21,02,06,10 * * 0-6 root /var/jautoup/runjauto.sh >/dev/null 2>&1
#end
วันอาทิตย์ที่ 26 ตุลาคม พ.ศ. 2557
noip
- cd /usr/local/src/
- wget http://www.no-ip.com/client/linux/noip-duc-linux.tar.gz
- tar xf noip-duc-linux.tar.gz
- cd noip-2.1.9-1/
- make install
- /usr/local/bin/noip2 -i eth0 -M
- /usr/local/bin/noip2 -C
- /usr/local/bin/noip2
in /usr/local/src/noip-2.1.9-1/README.FIRST
- sudo chmod 700 /usr/local/bin/noip2
chown root:root /usr/local/bin/noip2 - sudo nano /etc/rc.d/init.d/noip2 (sudo vim /etc/init.d/noip2)
#! /bin/sh
# . /etc/rc.d/init.d/functions # uncomment/modify for your killproc
case "$1" in
start)
echo "Starting noip2."
/usr/local/bin/noip2
;;
stop)
echo -n "Shutting down noip2."
killproc -TERM /usr/local/bin/noip2
;;
*)
echo "Usage: $0 {start|stop}"
exit 1
esac
exit 0
ctrl+x
y
enter
sudo chmod 755 /etc/init.d/noip2
sudo update-rc.d noip2 defaults
sudo reboot
หากต้องการจะแก้ไข Port Web Service 80 เป็น Port = 8080
sudo nano /etc/apache2/ports.conf
เปลี่ยน Listen = 80 ให้เป็น Listen = 8080
Restart Web Service Apache2 ใหม่
phpinfo()
วันอังคารที่ 14 ตุลาคม พ.ศ. 2557
วันเสาร์ที่ 13 กันยายน พ.ศ. 2557
noip2
/usr/local/bin/noip2 -i eth0 -M
เป็นการอัพเดท /usr/local/etc/no-ip2.conf
#=============================#
stop: /etc/init.d/noip2 stop
Shutting down noip2: noip2 killproc -TERM /usr/local/bin/noip2
restart: sudo /etc/init.d/noip2 restart
http://www.itmission.org/Main/NOIP
เป็นการอัพเดท /usr/local/etc/no-ip2.conf
#=============================#
stop: /etc/init.d/noip2 stop
Shutting down noip2: noip2 killproc -TERM /usr/local/bin/noip2
restart: sudo /etc/init.d/noip2 restart
http://www.itmission.org/Main/NOIP
###########################################################################
HOW TO USE THE CLIENT WITHOUT READING THE REST OF THIS TEXT

Usual operation?
/usr/local/bin/noip2 -C   configure a client
/usr/local/bin/noip2   run a client
/usr/local/bin/noip2 -S   display info about running clients
/usr/local/bin/noip2 -D pid  toggle the debug state for client pid
/usr/local/bin/noip2 -K pid  terminate client pid

Have more than one internet access device?
/usr/local/bin/noip2 -M -c file  start additional instances

###################################################################### ==>>>
jhcis@jhcis-srv:~$ sudo su
[sudo] password for jhcis:
root@jhcis-srv:/home/jhcis# /usr/local/bin/noip2 -S
1 noip2 process active.

Process 1368, started as noip2, (version 2.1.9)
Using configuration from /var/lib/noip2/noip2.conf
Last IP Address set 0.0.0.0
Account pongpol07@gmail.com
configured for:
 host  pcu-nonghouchang.no-ip.biz
Address check every 5 minutes, directly connected via /dev/Eth0.

Configuration data from /usr/local/etc/no-ip2.conf.
Account pongpol07@gmail.com
configured for:
 host  thph-nonghouchang.ddns.net
Updating every 5 minutes via /dev/Eth0 with NAT enabled.
root@jhcis-srv:/home/jhcis#
#######################################################################
USAGE: noip2 [ -C [ -F][ -Y][ -U #min]][ -c file]
[ -d][ -D pid][ -i addr][ -S][ -M][ -h]
Version Linux-2.x.x
Options: -C create configuration data
-F force NAT off
-Y select all hosts/groups
-U minutes set update interval
-c config_file use alternate data path
-d increase debug verbosity
-D processID toggle debug flag for PID
-i IPaddress use supplied address
-I interface use supplied interface
-S show configuration data
-M permit multiple instances
-K processID terminate instance PID
-h help (this text)
#################################################################
echo "Stopping No-IP"
killall noip2
วันเสาร์ที่ 6 กันยายน พ.ศ. 2557
วันพฤหัสบดีที่ 17 กรกฎาคม พ.ศ. 2557
Removing XAMPP from Ubuntu
Removing XAMPP from Ubuntu is simple. Follow the following steps:
1. XAMPP gets itself installed in “opt/lampp” directory by default.
2. Stop the XAMPP server by typing sudo /opt/lampp/lampp stop in the Terminal (you can open the terminal by pressing Ctrl+Alt+t).
3. Now type sudo rm -rf /opt/lampp4. Check your opt directory. The folder “lampp” would have been removed.
5. You have successfully removed XAMPP from your Ubuntu.
2. Stop the XAMPP server by typing sudo /opt/lampp/lampp stop in the Terminal (you can open the terminal by pressing Ctrl+Alt+t).
3. Now type sudo rm -rf /opt/lampp4. Check your opt directory. The folder “lampp” would have been removed.
5. You have successfully removed XAMPP from your Ubuntu.
วันพุธที่ 2 กรกฎาคม พ.ศ. 2557
วิธีแก้ปัญหา Error 0×80070522: A required privilege is not held by the client
บทความนี้คัดลอกมาจาก http://www.ilovebrowser.com/วิธีแก้ปัญหา-error-0x80070522-a-required-privilege-is-not-held-by-the-client/
แก้ด้วย Local Security Policy(secpol) ทำได้ ดังนี้
- อันดับแรก ให้ไปที่ ให้ไปที่ Start > แล้วพิมพ์คำว่า “secpol.msc”(ไม่ต้องมี “”) จากนั้นจะปรากฏดังรูป
ให้คลิกที่ secpol.msc - อันดับต่อมา จะปรากฏหน้าต่าง Local Security Policy ให้คลิกไปที่ Local Policies->Security Options
แล้วดับเบิ้ลคลิกที่ “User Account Control: Run all administrators in Admin Approval Mode” เพื่อเปลี่ยนค่าเป็น Disable ดังรูป - อันดับสุดท้าย ให้กดปุ่ม OK และปิดหน้าต่าง Local Security Policy ออกไป จากนั้นให้รีสตาร์ทเครื่อง


วันอังคารที่ 3 มิถุนายน พ.ศ. 2557
sqlyog_ultimate_reg.reg(11.3.3-0)
Windows Registry Editor Version 5.00
[HKEY_CURRENT_USER\Software\{906D6D9F-AB51-429F-8816-8D33284204FF}]
"InE"=hex:c6,c6,c4,cc,c6,62,66,ca,5a,c6,66,62,c8,5a,68,64,c6,ca,5a,70,72,66,72,\
5a,66,c6,6e,ca,6c,66,ca,c8,6a,68,62,6e
"x64"=dword:00000001
"InU"=hex:65,64,64,64,39,64,36,37,2d,30,34,37,39,2d,34,37,61,37,2d,38,36,31,35,\
2d,63,34,39,33,34,61,32,36,65,38,37,66
"Name"=hex:8c,ea,d8,d8,ac,ca,e4,e6,d2,de,dc
"x86"=dword:00000001
วันจันทร์ที่ 2 มิถุนายน พ.ศ. 2557
เป็นงง ในเว็บเขาบอก jdkhome="C:\\Program Files\\Java\\jre7"
# ${HOME} will be replaced by user home directory according to platform
default_userdir="C:\Users\polngpole\AppData\Roaming\.ireport\5.5.0"
default_mac_userdir="${HOME}/Library/Application Support/${APPNAME}/5.5.0"
# options used by the launcher by default, can be overridden by explicit
# command line switches
default_options="--branding ireport -J-Xms256m -J-Xmx512m -J-Dorg.netbeans.ProxyClassLoader.level=1000 -J-XX:MaxPermSize=512m -J-Dapple.laf.useScreenMenuBar=true -J-Dapple.awt.graphics.UseQuartz=true "
# for development purposes you may wish to append: -J-Dnetbeans.logger.console=true -J-ea
# default location of JDK/JRE, can be overridden by using --jdkhome
jdkhome="jdkhome="C:\Program Files\Java\jdk1.7.0_80"
# clusters' paths separated by path.separator (semicolon on Windows, colon on Unices)
#extra_clusters=
วันอาทิตย์ที่ 1 มิถุนายน พ.ศ. 2557
ยังแก้ไม่ได้ในบล็อก ในเว็บใช้แบบนี้ได้
/* แบบ advance
function execInBackground($cmd) {
if (substr(php_uname(), 0, 7) == "Windows"){
pclose(popen("start /B ". $cmd, "r"));
}
else {
exec($cmd . " > /dev/null &");
}
}
execInBackground($command);
แบบนี้เบสิค ก็ใช้ได้ครับ
$command = "B:\\Users\Public\\Documents\\2.docx";
exec($command);
*/
exec("B:/Users/Public/Documents/2.docx");
?>
วันเสาร์ที่ 17 พฤษภาคม พ.ศ. 2557
Cannot access Windows 7 shared folder from Linux box, logon failed
Hi dude,
I think this will defiantly help you. It will remove all the login restriction to access window share.
First, click on “Start”.
Type the command: –>regedit …
and execute it.
Type the command: –>regedit …
and execute it.
Look for and modify these parameters as the following:
HKEY_LOCAL_MACHINE\System\CurrentControlSet\Control\Lsa
On the right side find ‘everyoneincludesanonymous’; change the value to 1
Find ‘NoLmHash’ and change the value to 0
On the right side find ‘everyoneincludesanonymous’; change the value to 1
Find ‘NoLmHash’ and change the value to 0
HKEY_LOCAL_MACHINE\System\CurrentControlSet\Services\LanManServer\Parameters
‘restrictnullsessaccess’; change the value to 0
‘restrictnullsessaccess’; change the value to 0
Close the registry editor and restart the computer. Restart your CinemaTube as well using your remote control.
- Proposed as answer by E----- Friday, March 04, 2011 6:52 PM

วันอังคารที่ 13 พฤษภาคม พ.ศ. 2557
เอา Malwarebytes ออกไม้ได้ แงๆ
คอมอืดจนค้างเลย กว่า windows 8.1 เข้า safemode ได้โดยเครื่องไม่ค้างไปซะก่อน เฮ้อ..เหนื่อย เอางี้ เก็งลิงค์ไว้ก่อนล่ะกัน
http://downloads.malwarebytes.org/file/mbam_clean
http://downloads.malwarebytes.org/file/mbam_clean
วันศุกร์ที่ 9 พฤษภาคม พ.ศ. 2557
mysql-backup-jhcisdb.sh & import.bat ( Restore )
# !/bin/sh
if [ ! -d /home/jhcis/Dropbox/backupjhcis ] ; then
sudo mkdir /home/jhcis/Dropbox/backupjhcis
sudo chmod 777 -fR /home/jhcis/Dropbox/backupjhcis
fi
sudo mysqldump --default-character-set=utf8 -u root -p123456 jhcisdb --routines --compatible=no_key_options > /home/jhcis/Dropbox/backupjhcis/jhcisbackup.03301-$(date -d "+0 day" "+%Y-%m-%d").sql
sudo rm -f /home/jhcis/Dropbox/backupjhcis/jhcisbackup.03301-$(date -d "-7 day" "+%Y-%m-%d").sql
exit 0
ของหนองหัวช้างครับ
# !/bin/sh
if [ ! -d /home/jhcis/Dropbox/backupjhcis ] ; then
sudo mkdir /home/jhcis/Dropbox/backupjhcis
sudo chmod 777 -fR /home/jhcis/Dropbox/backupjhcis
fi
if [ ! -d /home/jhcis/backupjhcis ] ; then
sudo mkdir /home/jhcis/backupjhcis
sudo chmod 777 -fR /home/jhcis/backupjhcis
fi
sudo /opt/lampp/bin/mysqldump --default-character-set=utf8 -u root -p123456 jhcisdb --routines --compatible=no_key_options > /home/jhcis/Dropbox/backupjhcis/jhcisbackup.03301-$(date -d "+0 day" "+%Y-%m-%d").sql
sudo rm -f /home/jhcis/Dropbox/backupjhcis/jhcisbackup.03301-$(date -d "-7 day" "+%Y-%m-%d").sql
sudo /opt/lampp/bin/mysqldump --default-character-set=utf8 -u root -p123456 jhcisdb --routines --compatible=no_key_options > /home/jhcis/backupjhcis/jhcisbackup.03301-$(date -d "+0 day" "+%Y-%m-%d").sql
sudo rm -f /home/jhcis/backupjhcis/jhcisbackup.03301-$(date -d "-732 day" "+%Y-%m-%d").sql
sudo /opt/lampp/bin/mysqldump --default-character-set=utf8 -u root -p123456 jepidem --routines --compatible=no_key_options > /home/jhcis/Dropbox/backupjhcis/jepidembackup.03301-$(date -d "+0 day" "+%Y-%m-%d").sql
sudo rm -f /home/jhcis/Dropbox/backupjhcis/jepidembackup.03301-$(date -d "-7 day" "+%Y-%m-%d").sql
sudo /opt/lampp/bin/mysqldump --default-character-set=utf8 -u root -p123456 jepidem --routines --compatible=no_key_options > /home/jhcis/backupjhcis/jepidembackup.03301-$(date -d "+0 day" "+%Y-%m-%d").sql
sudo rm -f /home/jhcis/backupjhcis/jepidembackup.03301-$(date -d "-2222 day" "+%Y-%m-%d").sql
exit 0
Restore
cd\
cd C:\Program Files\JHCIS\MySQL\bin
mysql --default-character-set=utf8 -uroot -p123456 -P3333 -f jhcisdb < "C:\\sqlBackupFileName.sql"
pause
วันอาทิตย์ที่ 4 พฤษภาคม พ.ศ. 2557
แทรก youtube ใน joomla
ใน bloger ใช้ iframe ธรรมดาได้ แต่ใน joomla ต้อง Components -> JCE Editor -> Global Configuration -> Validate HTML -> No หรื่อไม่ก็ฝังแบบใช้โค้ดฝังเก่า (Embed แบบ object) โดยแบบหลังต้องให้ Validate HTML ของ JCE Editor -> Yes คือตรงกับค่าเริ่มต้นของ JCE Editor
แต่ถ้าต้องการเปิดในหน้าใหมี คลิกที่นี่
วันอาทิตย์ที่ 13 เมษายน พ.ศ. 2557
แก้ปัญหาแชร์ printer ใน ubuntu ไม่ได้
1.update samba :-
sudo add-apt-repository ppa:automation/ppa
sudo apt-get update
sudo apt-get upgrade samba
2.ตรวจสอบ user ชื่อ nobody
วันเสาร์ที่ 12 เมษายน พ.ศ. 2557
Where is the cron / crontab log?
เราสามารถสร้างไฟล์ cron.log เพื่อเก็บข้อมูลการทำงานของ cron.
เปิดไฟล์
sudo gedit /etc/rsyslog.d/50-default.conf
ค้นหาแถวที่เริ่มต้นด้วย:
#cron.*
เอาเครืองหมายคอมเม้นหน้าข้อความออก แล้วรีสตาร์ท rsyslog:
sudo service rsyslog restart
เราสามารถดูการทำงานของ cron ได้โดย :
gedit /var/log/cron.log
การทำงาน (มันเป็นไปตามที่กำหนดไว้ใน syslog).
วันเสาร์ที่ 22 มีนาคม พ.ศ. 2557
การเปิดใช้งานปุ่ม F8 เพื่อเรียก Safe Mode บน Windows 8.1
ด้วย
โครงสร้าง Boot Loader ตัวใหม่ที่ใช้บน Windows 8 / 8.1
กับการบูตเพื่อเข้าใช้งานในระบบจะสังเกตเห็นได้ชัดว่ามันทำงานได้รวดเร็ว
ขึ้น ส่วนหนึ่งก็เพราะทางไมโครซอฟต์เขาซ่อนฟีเจอร์ขั้นสูงอย่าง Advanced
Boot Option กับการเรียกใช้งาน Safe Mode ทำให้ค่าดีฟอลล์หลังจากติดตั้ง
Windows 8 / 8.1 เสร็จแล้ว และต้องการบูตเริ่มระบบใหม่
เพื่อต้องการกดปุ่มคีย์ลัด F8 สำหรับเรียกเข้าสู่หน้าจอ Safe Mode
จะไม่สามารถทำได้ครับ จนกว่าเราจะเข้าไปเปิดให้เมนูบูทด้วยตนเองเสียก่อน
ฟีเจอร์ F8 ถึงจะทำงานได้
เรามาดูวิธีการปรับแต่งกัน
โดยเลื่อนเม้าส์ไปเปิด Menu bar -> หัวข้อ Search -> พิมพ์ CMD หรือ
Command Prompt แล้วคลิกขวาเพื่อเลือก Run as administrator

แล้วพิมพ์คำสั่ง bcdedit /set {default} bootmenupolicy legacy ตามด้วยกด Enter 1 ครั้ง พร้อมกับปิดหน้าต่างนี้ลงได้เลย

หลังจากนี้ก็ลองรีสตาร์ทเครื่องดูใหม่ พร้อมกับกดปุ่ม F8 ย้ำๆ ก็จะมีเมนู
Advanced Boot Options ให้สามารถเข้าใช้งานไปยังหน้าจอ Safe Mode
ได้แล้วครับ

ในส่วนของการปิดการทำงานไม่ให้มีการกดปุ่ม F8 ได้ เราก็สามารถปิดได้ด้วยคำสั่งต่อไปนี้เช่นเดียวกัน
bcdedit /set {default} bootmenupolicy standard แล้วกด Enter 1 ครั้ง

สมัครสมาชิก:
ความคิดเห็น (Atom)